Tag Archives: EXCHANGE
Netflex was weer aanwezig bij Microsoft Ignite dit jaar, zij het wat in een andere hoedanigheid. Normaliter zouden we afgereisd zijn naar New Orleans, om daar al het nieuws dat Microsoft en haar partners ons te vertellen hebben te horen. Maar i.v.m. de wereldwijde Corona-problemen is het event dit jaar digitaal.
Dit betekent 3 dagen vol met sessies, on demand of live, maar ook Meet the Experts en de mogelijkheid om digitaal over de Expo te lopen, zodat tóch ook dat contact met andere vendoren onderhouden kan worden. Ik moet zeggen dat dit wel heel anders is dan daadwerkelijk aanwezig zijn. Ik vind het leuker en interessanter om met een persoon te spreken, dan om digitaal wat vragen af te vuren en verwezen te worden naar een demo op het internet i.p.v. een live demo te kunnen volgen.
Keynote
Zoals elk jaar begon ook dit jaar Ignite met de keynote van Satya Nadella. De titel was dit jaar “Building Digital Resilience”. Een highover sessie van 60 minuten waarin o.a. het volgende werd besproken:
- Microsoft flight Simulator Next
Een filmpje over Flight Simulator, hoe het ooit begonnen is in 1984 en hoe de nieuwe versie eruit ziet. Grafisch ziet het spel er erg mooi uit, alsof je er echt overheen vliegt. Erg mooi gedaan. De nieuwe versie van Flight Simulator zal dit jaar uitkomen. Zie hier voor screenshots: t.ly/9bhv
- Azure
Er zijn nu 61 datacenters wereldwijd en er komen er meer aan.
Azure Arc is nu beschikbaar. Met Azure Arc kan je elke infrastructuur (on-premise Microsoft Cloud, Amazon Cloud etc.) managen met Azure. Ook is het mogelijk om monitoring en reporting te doen op deze omgevingen. Azure Arc kan zonder extra kosten ingezet worden, zie de aankondiging hier: https://t.ly/1hh4
- PowerApps
Azure Api Management for Powerapps in Teams is aangekondigd.
Nu nog in preview, Power Automate Desktop. Power Automate Desktop kan on-premise applicaties op de desktop en in de webbrowser automatiseren. Voor meer informatie: http://t.ly/d94U
- Edge voor Linux
Microsofts browser Edge komt beschikbaar voor linux in oktober.
- Microsoft Teams
Microsoft Teams krijgt nieuwe updates, zoals 49 personen in 1 view in video meetings. Met “Together mode” is er de auditorium view en nu met chat bubbles, waardoor je extra discussies kunt creëren tijdens een sessie.
Er zijn ook nieuwe Microsoft Teams Room Devices: https://rooms.microsoft.com/
- Alle aankondigingen in 1 document
Net zoals voorgaande jaren heeft Microsoft van alle aankondigingen een overzicht gemaakt in het “Book of News”. Dit jaar is er een digitale versie van het “Book of news” met alle aankondigingen:

Sessies
Naast de keynote en een aantal standaard live sessies – die allemaal terug te zien zijn op Youtube: http://t.ly/QWbh – waren er natuurlijk ook de normale sessies te volgen.
Wat highlights:
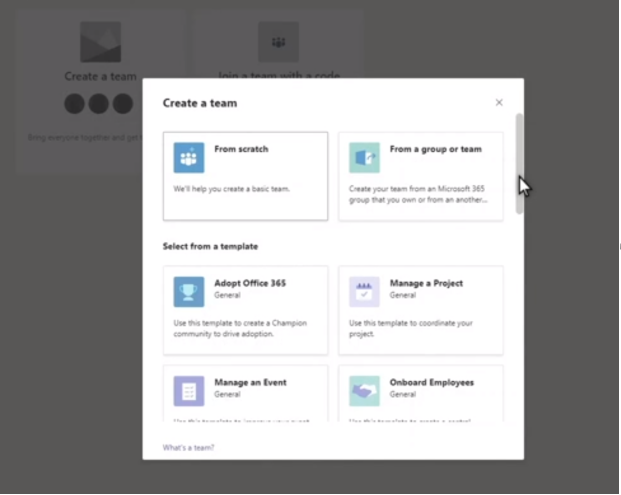
Teams Templates
Het wordt mogelijk om Teams aan te maken aan de hand van templates. Gebruikers kunnen zelf kiezen welke template ze willen gebruiken of beheerders kunnen templates aanmaken:
Er komt een betere zoekmogelijkheid in Teams en meldingen wanneer een bestand verplaatst is. Zodat dat bestand waar je vorige week nog in werkte, maar door je collega verplaatst is naar een ander Team/Site, weer gemakkelijk terug te vinden is.
Azure Arc
Azure Management voor Windows en Linux servers, SQL servers en Kubernetes Clusters in zowel on-premise datacenters als multicloud, dat is Azure Arc. Vorig jaar aangekondigd, maar dit jaar verder uitgebreid. On-premise en Multicloud servers kunnen nu beheerd worden vanuit Azure alsof het Azure Devices zijn.
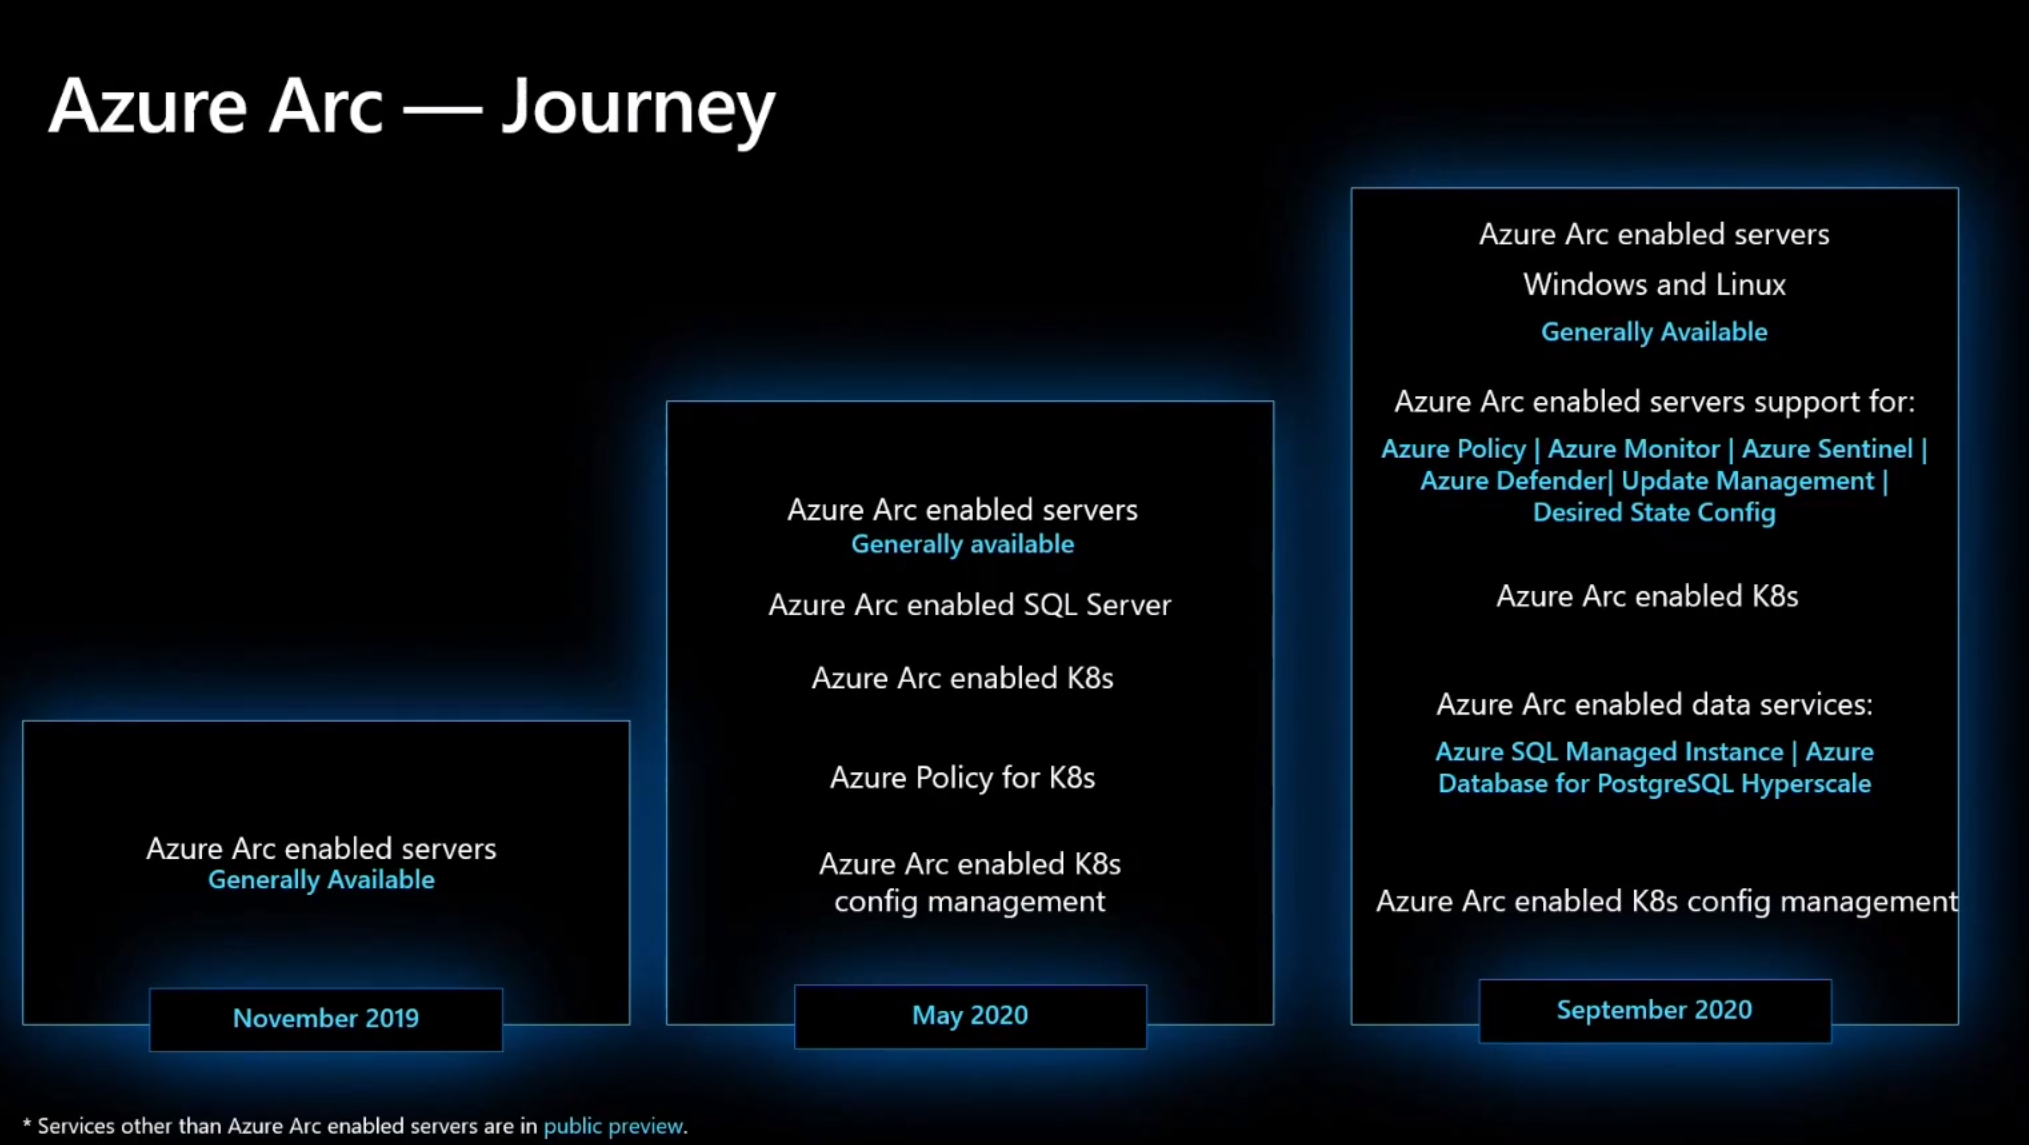
Azure Arc is gratis te gebruiken voor iedereen die al een Azure subscription heeft. Er is geen VPN nodig, een simpele verbinding voor de Azure Arc Agent op poort 443 is voldoende.
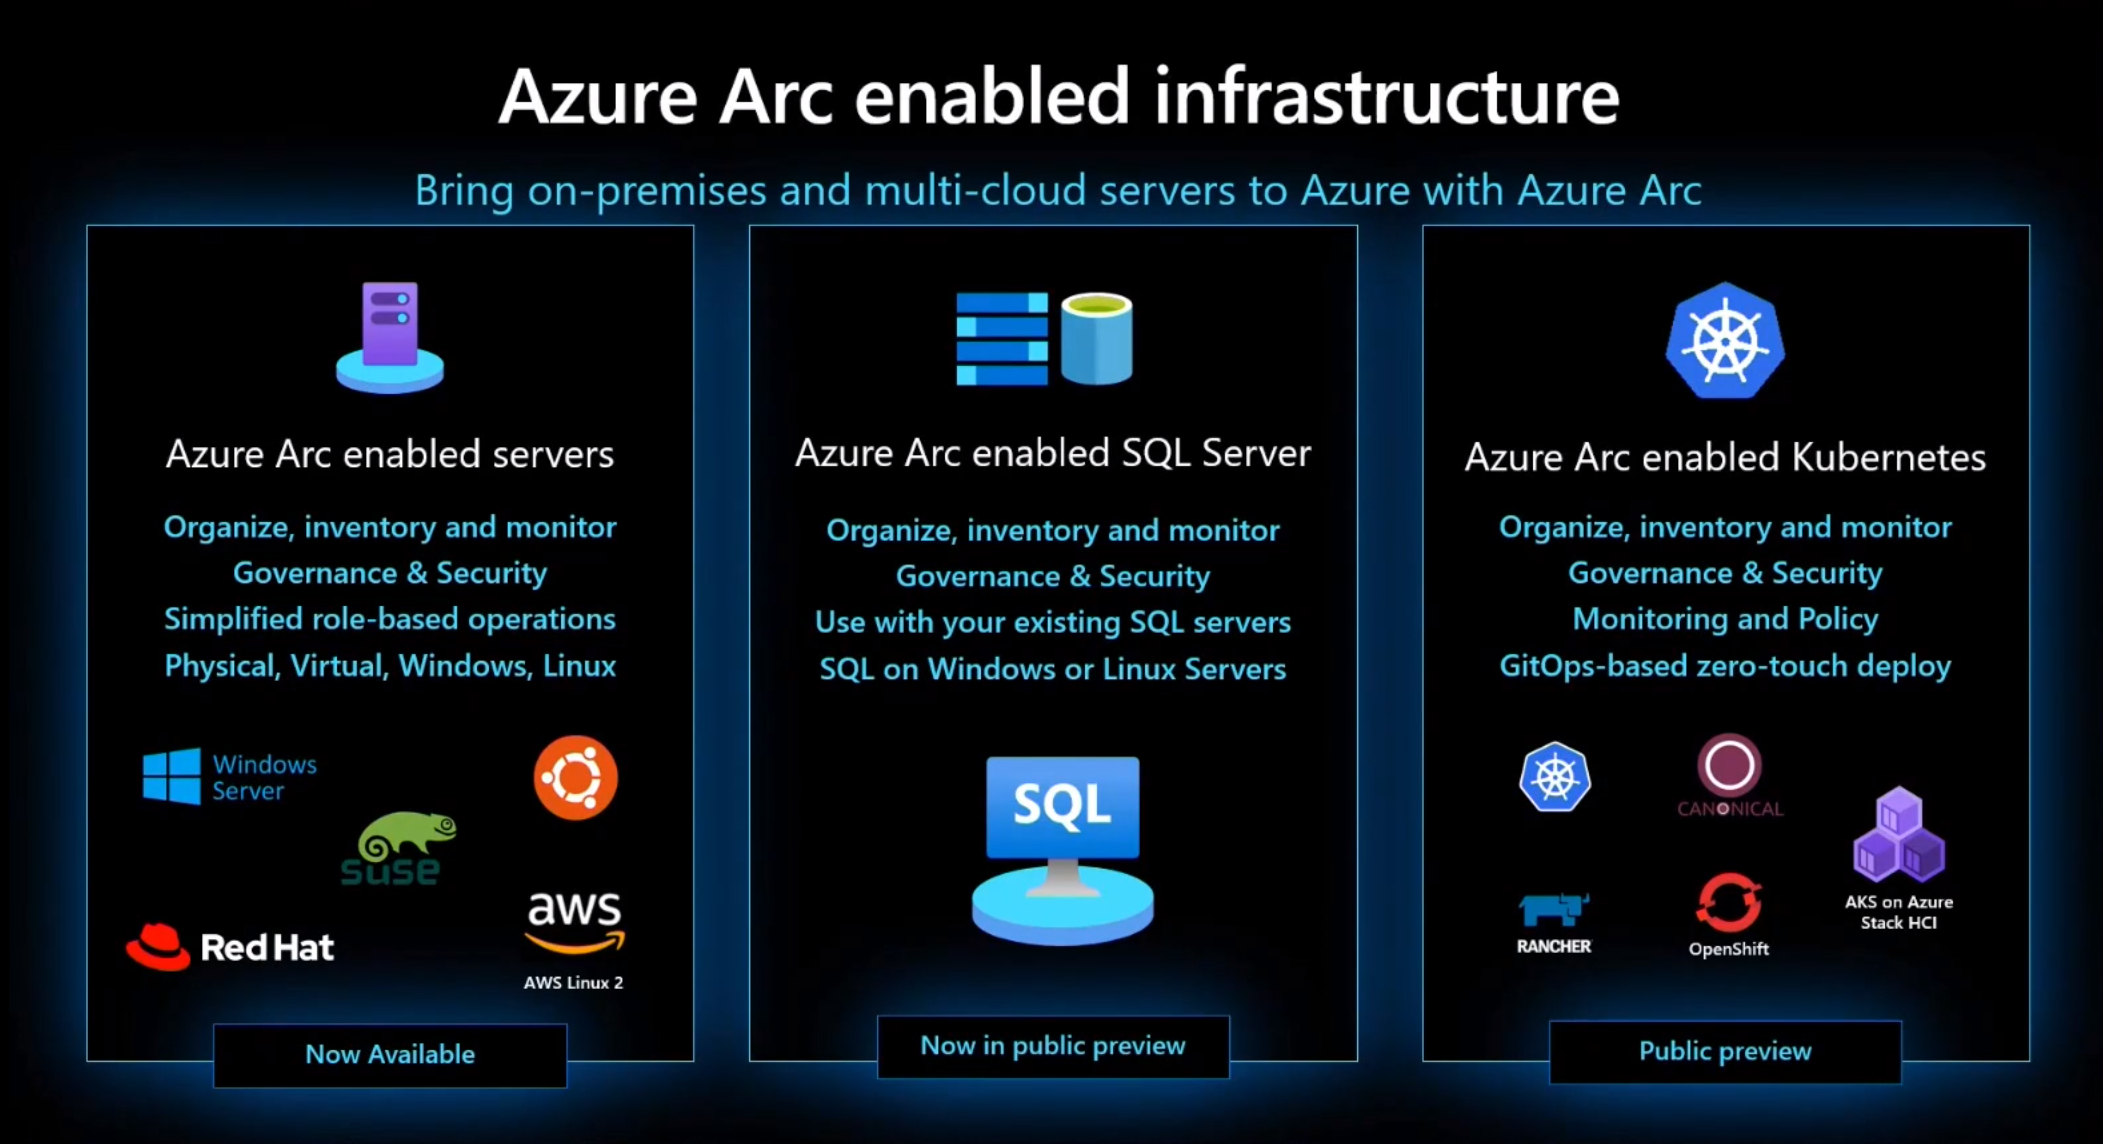
Dit is inclusief inventory, organiseren van servers in hiërarchie en queries op inventory en servers. Daarnaast is het mogelijk om tegen betaling gebruik te maken van het Azure Security Center, Azure Monitor en Update Management. Azure Arc-enabled Kubernetes en Azure Arc-Enabled SQL server zijn op dit moment nog in public preview.
Exchange
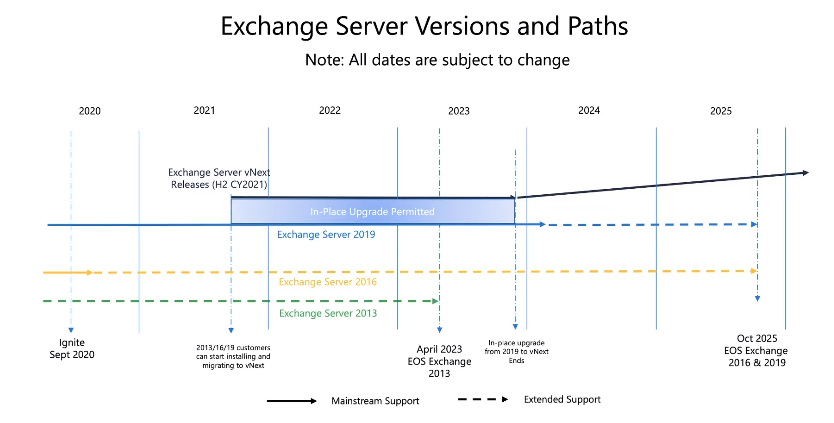
Microsoft heeft aangekondigd dat de volgende versies van Exchange Server, SharePoint Server, Skype For Bussiness Server en Project Server vanaf de tweede helft van 2021 beschikbaar komen. Deze zijn alleen beschikbaar door aankoop van een subscription. Voor Microsoft Office zal er ook een nieuwe versie verschijnen in de tweede helft van 2021.
Microsoft adviseert om wanneer mogelijk naar Exchange Server 2019 te migreren, waarna er een in-place upgrade mogelijk is naar Exchange Server vNext binnen 2 jaar. Daarna is een upgrade ook mogelijk, maar dan weer met opbouw van nieuwe servers en migreren van mailboxen.
Indien er gebruikt gemaakt wordt van Hybrid Exchange, is het goed om eens te kijken naar de on-premise Exchange server versie. De mainstream support van Exchange 2016 eindigt op 14 oktober 2020. Er zullen nog wel updates uitkomen, maar advies is om te upgraden als er voor langere tijd nog on-premise mailboxen aanwezig zullen zijn.
Exchange Mailbox Role Calculator zal niet meer meegeleverd worden op de DVD/ISO download, maar kan los gedownload worden.
De nieuwe Exchange Admin Portal
http://admin.exchange.microsoft.com
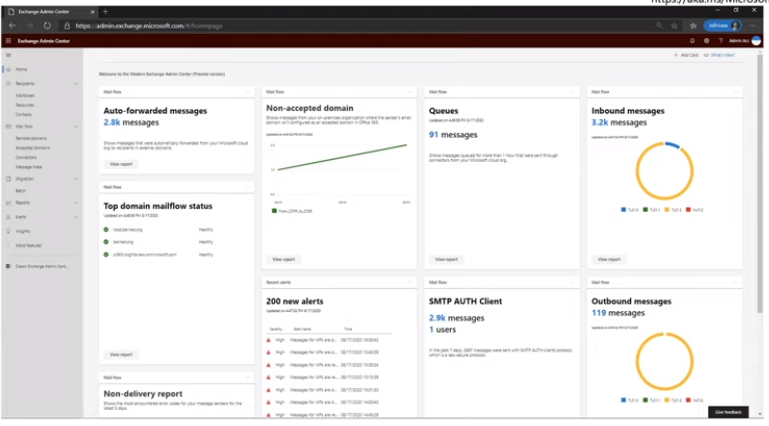
In het nieuwe Exchange Admin Center is het mogelijk zelf een dashboard aan te maken en bijvoorbeeld de mailflow inzichtelijk te maken. Daarnaast is het management vereenvoudigd. De opbouw is gelijkend aan de admin portal van Office 365. Het is nog niet helemaal af, maar als beheerder kan je hier al wel gebruik van maken, door het bekende schuifje om te zetten op de huidige Exchange Admin Portal. Microsoft verwacht dat de nieuwe Exchange Admin Portal in Q1 2021 klaar is.
Hybrid Exchange naar meerdere tenants.
Het was al mogelijk om manueel een verbinding te maken tussen een on-premise Exchange naar Exchange Online, maar deze was ingewikkeld. Door ondersteuning in te bouwen in Exchange 2016/2019 wordt dit een stuk gemakkelijker. Ook zijn er veel ontwikkelingen voor multi-tenant beheer en samenwerking tussen tenants.
Powershell Exchange V2 Admin
Powershell V2 Admin voor Exchange, ook vorig jaar aangekondigd, maar nu volledig in gebruik.
• 9 remote powershell commando’s zijn geoptimaliseerd voor bulk acties.
• De oude Cmdlets zijn er nog steeds.
• Modern Authentication wordt standaard ondersteund.
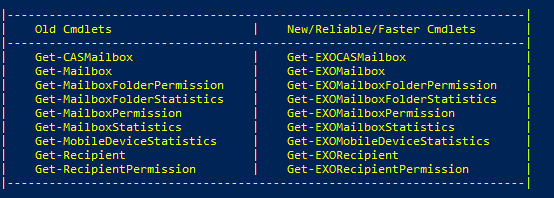
Er is een Linux en Powershell Core preview voor de EXO V2 module. Dus beheer vanuit een Linux omgeving is hierdoor een mogelijkheid.
Plus Addressing in Exchange Online
Ook een aankondiging van Ignite 2019, maar wordt momenteel uitgerold naar alle tenants. De verwachting is dat dit in oktober overal uitgerold is. Hoe dit werkt en wanneer je dit wilt gebruiken zal ik in mijn volgende blog toelichten.
From Exchange 2016 CU6 and for Exchange Online customers it is now possible to control the “Sent Items” behaviour of delegated User Mailboxes. This control is available for shared mailboxes since 2015.
How does it work?
Let’s say you have the following scenario:
- Jack is the CEO of the company
- Iris is a delegate on Jack’s mailbox; Iris has Send As rights on Jacks mailbox
- When Iris sends an email as Jack, the mail will only be in Iris’s “Sent Items” folder.
With the new feature enabled, the email will not only be in Iris’s “Sent Items” folder but both Jack and Iris will have the message in their “Sent Items” folder.
How to enable these settings?
These settings have to be set via powershell and cannot be set via the EAC / o365 portal as with shared mailboxes.
To enable these settings for “Sent On behalf”:
Enable message copySent On Behalf of the delegator For emails Sent On Behalf of the delegator:
Set-Mailbox <delegator mailbox name> –MessageCopyForSendOnBehalfEnabled $true
Disable message copySent On Behalf of the delegator For emails Sent On Behalf of the delegator:
Set-Mailbox <delegator mailbox name> –MessageCopyForSendOnBehalfEnabled $false
To Enable these settings for “Sent As”
Enable Message copy:
Set-Mailbox <delegator mailbox name> –MessageCopyForSentAsEnabled $true
Disable Message copy:
Set-Mailbox <delegator mailbox name> –MessageCopyForSentAsEnabled $false
In this 3-part blog I will discuss SPF, DKIM and DMARC. In this second part of the blog I will discuss DKIM.
DKIM stands for DomainKeys Identified Mail.
To understand how DKIM works, you can best look at it like when you sign a letter that you send by snailmail. DKIM sets up a form of signing for email, a key is sent with the email, which can be matched by the receiving party. If there is a match, then the signature of the email is genuine, and the email is forwarded to the receiving user. If there is no match, depending on the settings in the antispam tooling of the receiving party the email will be tagged as SPAM, deleted or just delivered.
DKIM for Exchange
For Exchange onPrem there is “Exchange DKIMSigner” this is a freeware tool, which can add DKIM signing to your emails. (https://github.com/Pro/dkim-exchange).
With this tool you can easily generate a private key, and it shows you the suggested DNS record.
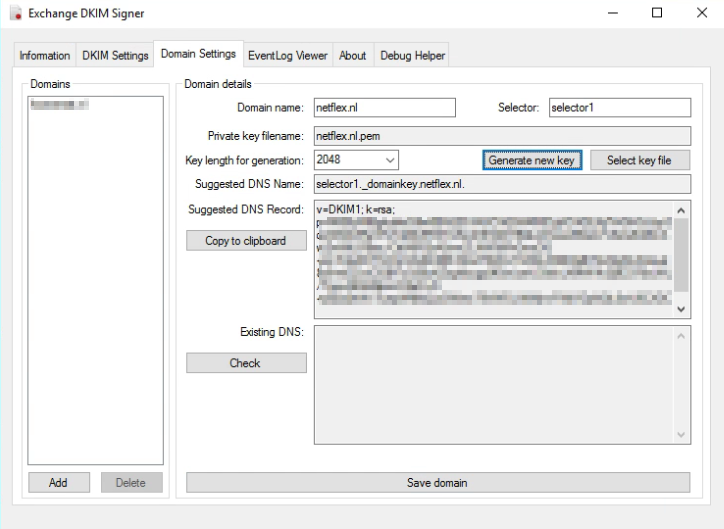
Setting the DNS record.
Setting the DNS record for Exchange Onprem works a bit different from setting the DNS record for Exchange Online. With Onprem you put the public key in the DNS record, so the other party can pick it up, with Exchange Online you point to another microsoft address for the public key (see DKIM for Exchange Online below).
With Exchange Onprem you only need one cname record:
Host name:			selector1._domainkey.<domain>
Points to address or value:	<Public Key Information>
TTL:				3600
For Example:
Host name:			selector1._domainkey.netflex.nl
Points to address or value:	v=DKIM1; k=rsa; p=MIIBIjANBgkqhkiG9w0BAQEFAAOCAQ8AMIIBCgKCAQEAjj7VrGHGJJzySqziW0AVReVFoTqlMo5RSTmKwZ3Fd2XY9QkJ21xweKEsxLFzSsAZiABIcAwZmWtLFlBac/CttlA6R2xA5vwZLNW5iiFhGmzOG+mi/S3aDCF7cOIuVG4G3tBh7dmdT6WwYn8SiLX3BEAjBtT2vEjiyfln4VaLet8z6+eEZvzClGBf7cQ59uKZogKycgq9fGwLseU30ckLXMWVk2ij9C978sUAL/TquyA6Xs86pozO2eD+N+yEba2hWv7ueqW6lfsQJxGWew79VWDLINWjnvFWijYDpNQL0wU6CXDCfWhCfhjenx2KHco/WoFk1y2/oXAFygeSrwyUVwIDAQAB
TTL:				3600
After the DNS record has been created, you can restart the Transport service via the DKIM Signer application, and all your emails will be signed.
DKIM for Exchange Online
When you are using Exchange in the cloud or “Exchange Online”, DKIM is build into the o365 portal. You can find it in the “Exchange Management portal” under “Protection”, “dkim”.
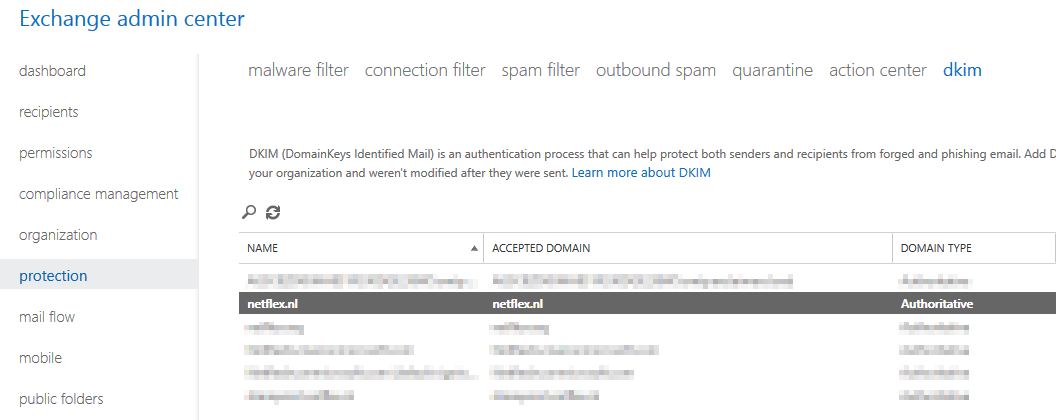
Before you can enable DKIM on your o365 tennant, you need to add 2 cname records to your DNS:
Host name:			selector1._domainkey.<domain>
Points to address or value:	selector1-<domainGUID>._domainkey.<initialDomain>
TTL:				3600

Host name:			selector2._domainkey.<domain>
Points to address or value:	selector2-<domainGUID>._domainkey.<initialDomain>
TTL:				3600
For example:
Host name:			selector1._domainkey.netflex.nl
Points to address or value:	selector1-netflex-nl._domainkey.Netflexbv.onmicrosoft.com
TTL:				3600

Host name:			selector2._domainkey.netflex.nl
Points to address or value:	selector2-netflex-nl._domainkey.Netflexbv.onmicrosoft.com
TTL:				3600
After you have added these DNS-records, you can enable DKIM in Exchange Online, and it works.
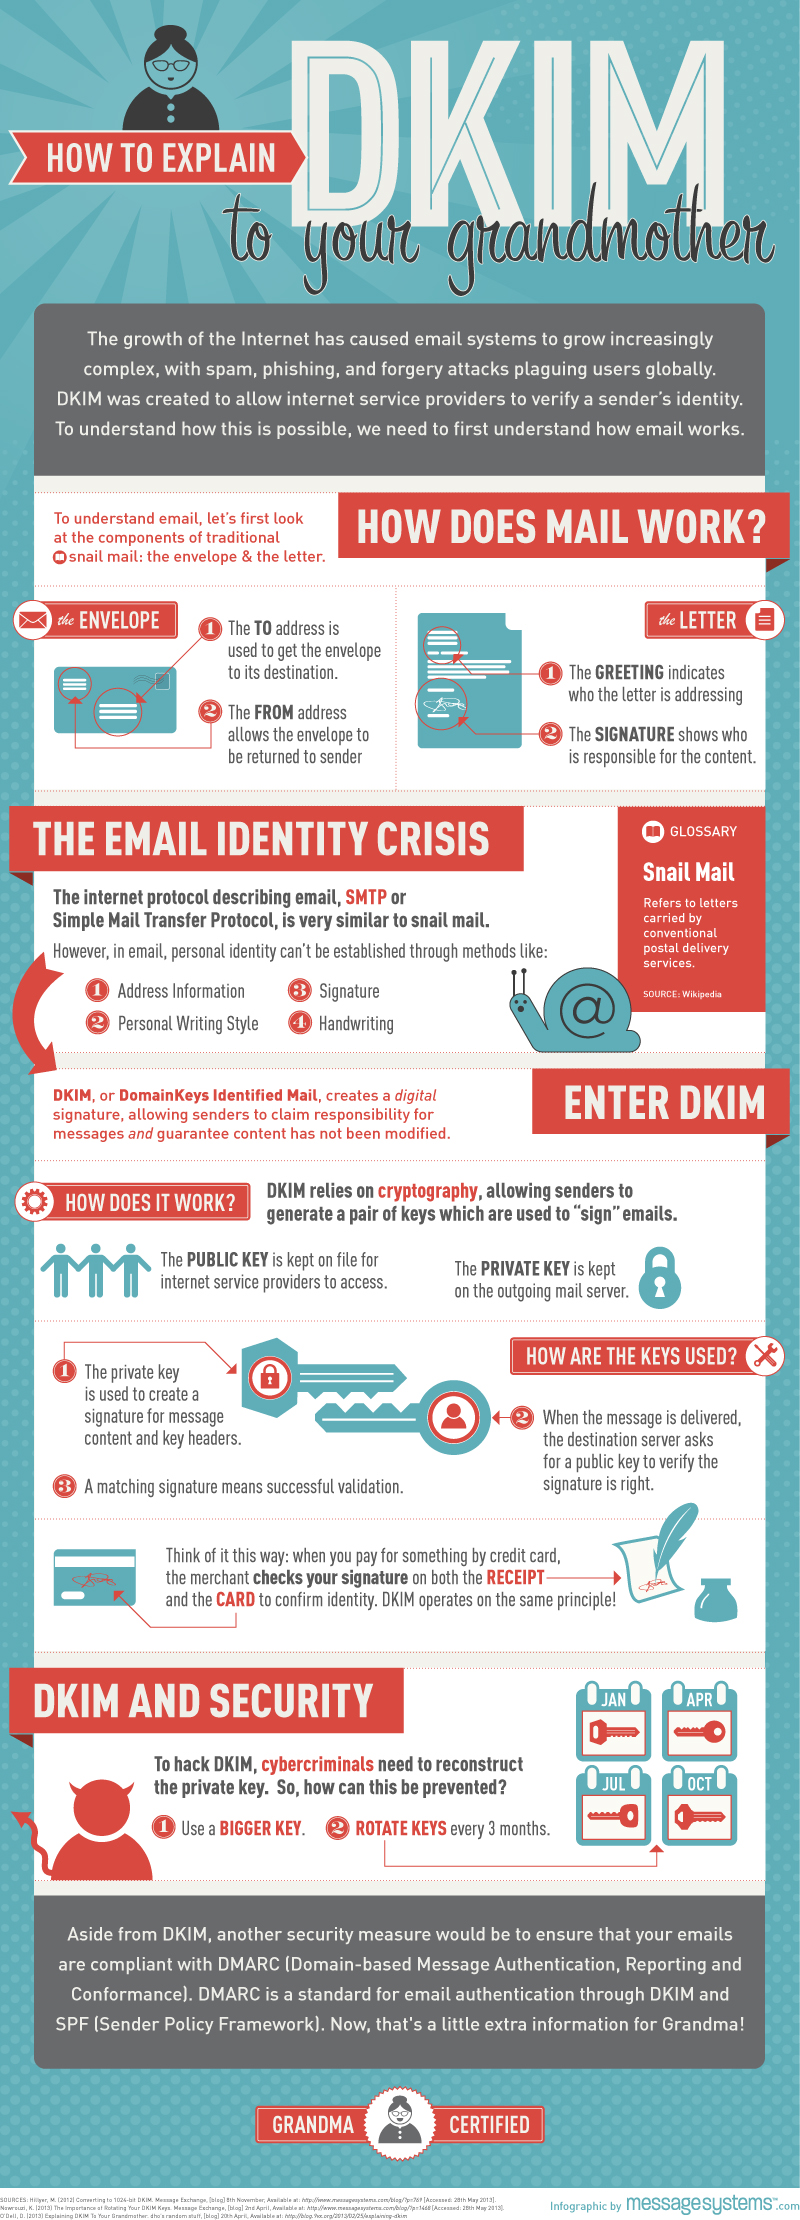
MessageSystems.com has a very cool and grandma-approved 😉 infographic on the subject:
Next time I will discuss DMARC (Domain-based Message Authentication, Reporting, and Conformance.
More information about DKIM you can find at:
https://en.wikipedia.org/wiki/DomainKeys_Identified_Mail
Since years there are some extra “settings” you can set to make sure your email does not get tagged as SPAM, as the other party can check if the email comes from a legitimate source.
There are some things you can do to make sure your email does not get tagged as SPAM:
- Do not get blacklisted.
- Make sure your server is not an open relay.
- Setup an Sender Policy Framwork (SPF)
- Setup a Domain-based Message Authentication, Reporting and Conformance (DMARC) policy
- Setup DomainKeys Identified Email
In the coming blogs I will write about how to setup SPF, DKIM and DMARC for an exchange system.
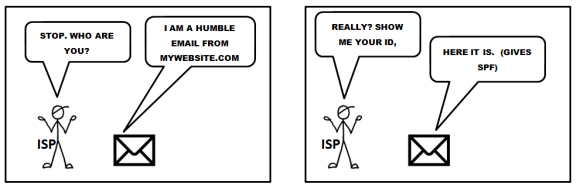
(SPF) Sender Policy Framework.
The Sender Policy Framework is published in 2006 by the IETF and made a standard in 2014. Originally called Sender Permitted From. The framework is setup to minimize the amount of spam coming in. In the SPF record you create you let the receiver end know from which ip-address or range of ip-adresses email sent by your organization can originate from. If the sending host is not in the SPF record, receiving mailservers can block the mail completely or mark it as spam.
An SPF record is setup in your DNS. It’s a TXT record.
There are lots of sites on the internet that test your spf record, lets have a look at our (Netflex.nl) SPF record:
 (From http://mxtoolbox.com/spf.aspx)
The first part of the spf record indicates the version of SPF: spf1
Then there are some includes, these are the domains that are searched for an allow when an email is accepted by a foreign server. The last option is -all, ?all or ~all depending if the email should:
Pass (+all)
Fail (-all)
SoftFail (~all)
Neutral (?all)
|
Result |
Explanation |
Intended action |
|
Pass |
The SPF record designates the host to be allowed to send |
accept |
|
Fail |
The SPF record has designated the host as NOT being allowed to send |
reject |
|
SoftFail |
The SPF record has designated the host as NOT being allowed to send but is in transition |
accept but mark |
|
Neutral |
The SPF record specifies explicitly that nothing can be said about validity |
accept |
|
None |
The domain does not have an SPF record or the SPF record does not evaluate to a result |
accept |
Our spf record is pretty strict and fails every email that does not fall in any of the includes. If you set up a spf record for the first time and do not know if every domain is accounted for in the spf record, you can set the qualifier to a setting that is less strict.
One of the best ways to create a good spf record for your environment is to check which sites sent mail for your domain, and then use a spf calculator, like the one on www.spfwizard.net
When you have created a well-defined spf record, go to your hosting provider and create a TXT record on their server with the appropriate settings.
To test your spf record you can use:
http://www.kitterman.com/spf/validate.html
I will discuss DKIM in my next blog.

Exchange Server User Monitor (ExMon) versie 14.2.247.5 is uit. Microsoft heeft deze versie gereleased in december 2011 en is compatible met Exchange 2000, 2003, 2007 en 2010. Continue Reading
It could happen you should change the Client Access Server for Outlook, for instance if a CAS server is unavailable due to a hardware issue. In this blog I will discuss how to change the RPCClientAccessServer in such case. Continue Reading
Recent Comments